← Support & technical documents
Cryo-EM grid preparation protocol
Operating parameters and step-by-step workflow for ANTcryo amorphous Ni-Ti alloy support films on the two most widely used plunge freezers.
About these notes
Each note is self-contained — read only the one for the instrument you use. They combine standard cryo-EM grid preparation practice with ANTcryo-specific recommendations. ANTcryo-specific statements are marked [ANTcryo]. Parameters marked "starting point" should be optimised for your sample.
Grid Preparation Protocol: Leica EM GP2
Instrument: Leica EM GP2 plunge freezer
Download PDFANTcryo Technical Note · TN-001
| Product | ANTcryo amorphous Ni-Ti alloy support films (holey films on standard TEM grids) |
| Instrument | Leica EM GP2 plunge freezer |
| Version | 1.1 |
| Date | 2026-01-01 |
| Status | Released |
This document is part of the ANTcryo technical documentation series. It combines standard cryo-EM grid preparation practice (as documented for Quantifoil holey carbon grids and the Leica EM GP2) with ANTcryo-specific recommendations. Sources are cited in brackets; ANTcryo-specific notes are marked ANTcryo. Parameters marked “starting point” should be optimised for the individual sample.
Revision History
| Version | Date | Changes |
|---|---|---|
| 1.1 | 2026-01-01 | Source verification: removed unverifiable citations, added verified references, corrected sample volume and chamber temperature data |
| 1.0 | 2025-01-01 | Initial release |
1. Materials
- ANTcryo grids (film side is the dull, non-reflective side) ANTcryo
- Glow discharge / plasma cleaner (e.g. Gatan Solarus, PELCO easiGlow, Quorum GloQube Plus, Harrick Plasma)
- Leica EM GP2 plunge freezer
- Liquid nitrogen (LN2); ethane, or a 63/37 ethane/propane mixture
- Blotting paper (pre-punched Whatman No. 1 or 541)
- Leica GP2 tweezers; fine grid-handling tweezers
- Grid storage boxes; cryo gloves and face shield
2. Grid Storage and Handling
- Store grids in the original grid box, dark, cool, low humidity; use within 2 years of production to guarantee surface quality. ANTcryo
- In humid conditions, keep grids sealed in a dry container and take them out ~30 min before use to equilibrate to room temperature. ANTcryo
- Inspect grids under a light microscope before use: grids are usable as long as the film is not visibly torn and the hole pattern is intact, even if the grid was briefly blown off by a gas flow. ANTcryo
- Special note: ANTcryo For Cell grids (MS01/MS03) are shipped pre-hydrophilised and can be used directly; after long storage, give them a short plasma treatment first. ANTcryo
3. Glow Discharge (Plasma Cleaning, Hydrophilisation)
Glow discharge renders the film surface hydrophilic, which is required for even ice formation and for the sample to stay in the holes. Freshly glow-discharged grids should be used within 30 minutes (hydrophilicity decays with time); some protocols recommend within 15 min. [Wang & Zimanyi 2024; Leica App Note 2017]
3.1 Recommended settings
Place grids film side up on a glass slide (or grid holder) in the glow discharge chamber.
| Instrument | Settings (industry standard) | ANTcryo recommendation |
|---|---|---|
| Gatan Solarus | H2/O2 mix, ~5-10 W (typical) | H2/O2, 5 W, 30 s (start) ANTcryo |
| PELCO easiGlow | 20 mA, 30 s per side [STAR Protoc 2020] | 15 mA, 30-60 s (start at 30 s) ANTcryo |
| Quorum GloQube Plus | 45 s @ 35 mA [Nat Commun 2025] | 30-60 s @ 25 mA (start) |
| Fischione 1070 | 40 W, 120-180 s, 9:1 Ar:O2, 21 mTorr [Quantifoil HexAuFoil official] | 30-60 s @ 25 mA (start) |
3.2 ANTcryo-specific notes
- The amorphous Ni-Ti alloy withstands glow discharge well; time and intensity can be increased if needed. As a reference, gold-film grids are commonly treated for ~120 s [Wang & Zimanyi 2024]. ANTcryo
- For a new batch, first run 2-3 grids to probe the best settings before committing the sample. ANTcryo
- Common practice for SPA (PELCO easiGlow): air glow discharge at 20-30 mA for 20 s on carbon grids, 120 s on gold grids, and 5 s on ultrathin carbon-coated grids. [Wang & Zimanyi 2024]
4. Leica EM GP2 Setup
Instrument SOP follows the published Leica EM GP2 operating procedure. [Leica GP2 SOP, cryoemcenters.org; Leica EM GP2 Application Note “Plunge Freezing of Microtubules”]
4.1 Environmental chamber
| Parameter | Typical SPA setting | Notes |
|---|---|---|
| Chamber temperature | 4-10 °C (SPA typical; up to 25 °C reported) | 4 °C for very sensitive samples [Leica App Note 2017; cryoemcenters.org SOP] |
| Relative humidity | 99 % (GP2 max) | 90-99 %; keep chamber ports closed when not pipetting |
| Cryogen temperature | ~ -183 °C | ethane, or 63/37 ethane/propane (does not freeze over) |
| GN2 flow (cryogen Dewar) | 100 % |
4.2 Before first use of the day
- Mount fresh blotting paper on the blotting arm; let it equilibrate inside the chamber for 15-20 min before blotting. Replace blot paper after every 10 blots or 20 min, whichever comes first. [Leica GP2 SOP]
- Fill the humidifier with distilled water (~60 ml); fill LN2 into the freezing chamber; condense ethane into the cryogen cup once the chamber is cold (below about -175 °C). [Leica GP2 SOP]
- Adjust horizontal/vertical blot positions with a blank grid loaded on the tweezers, then run one test blotting cycle.
4.3 Blotting parameters on the GP2 (difference vs Vitrobot)
The GP2 has no “blot force” dial; blotting is controlled by blot time + blot position (the tweezers/blot arm positions are set once, and the unique infrared blotting sensor adds a fine advance of the paper toward the drop).
- Starting point for ANTcryo grids: blot time 2.5-4 s, sensor advance +1.4 mm, blot from the film side. ANTcryo — extrapolated from our Vitrobot settings below; not a separately published GP2 value
- The ANTcryo film tolerates blotting well; in Vitrobot units our standard is blot time 3 s, force 2, one blot, which routinely gives thin, even ice (see Section 6). On the GP2, start at 2.5-4 s and screen a couple of grids to tune ice thickness. ANTcryo
5. Sample Application
- Use 3-4 µL of sample per grid (typical). The GP2 blotting sensor is designed for ~4 µL; 3 µL works reliably. [VIB BECM GP2 SOP; Nat Commun 2025]
- Apply the drop onto the film side; do not touch the film with the pipette tip.
- Concentration starting points ANTcryo:
- Apoferritin: 1-1.5 mg/ml as a standard reference (screen 2-3 concentrations if needed)
- For scarce/challenging samples (e.g. membrane proteins): the low-adsorption Ni-Ti surface keeps more of the precious sample in the holes; test a small grid set before scaling up. ANTcryo
- Optional: incubate the drop on the grid for 20-30 s in the humidified chamber before blotting (adsorption/incubation improves particle density for some samples). [Nat Commun 2025; Leica App Note]
6. Expected Ice Behaviour (ANTcryo)
- The smooth, uniformly hydrophilic Ni-Ti film favours even ice of 20-80 nm, reducing thick/thin ice gradients. ANTcryo
- Under our standard Vitrobot settings (blot 3 s / force 2 / 1 blot), the success rate for ~20 nm ice is notably higher than on conventional carbon films. On the GP2, expect a similar window; verify with your first grids. ANTcryo
7. Plunge Freezing and Transfer
- Load the glow-discharged grid on the Leica GP2 tweezers (film side facing the side you will pipette onto), click the tweezers into the plunge rod.
- Press “LOAD SPECIMEN”; apply the sample through the side port.
- Press “BLOT” (auto-plunge after blotting if enabled); the grid plunges into liquid ethane.
- After plunging, immediately transfer the grid, while submerged in LN2, from the ethane cup into an open slot of the grid box in the transfer container.
- Store grid boxes in LN2 until screening/data collection.
8. Troubleshooting
| Symptom | Likely cause | Remedy |
|---|---|---|
| Wavy/corrugated square edges | Uneven glow discharge; excessive blot force or blot time | Retune glow discharge; reduce blot time / relax blot position ANTcryo |
| Droplets / thick ice | Humidity too low, or blotting too weak | Check chamber humidity (99 %); increase blot time ANTcryo |
| Particles stuck to film, few in holes | Film surface not hydrophilic enough | Re-glow discharge (longer time); check the 30-min window ANTcryo |
| Grid damage after blotting | Blot pressure too high; bent grids | Some edge damage is normal and does not affect data (1-2 central squares suffice); discard bent grids ANTcryo |
| Poor ice reproducibility between sessions | Humidity/water contamination | Replace blot paper; check humidifier fill; keep ports closed |
9. Sources
- Leica Microsystems, “Plunge Freezing of Microtubules” EM GP2 Application Note (2017): Quantifoil R2/2 on 400-mesh Cu, glow discharge 45 s, 25 °C / 95 % RH, blot 1.3 s +1.75 mm.
- Leica EM GP2 Standard Operating Procedure, cryoemcenters.org: blot paper equilibration 15-20 min, humidifier ~60 mL, ethane condensation below -175 °C, blot paper replaced every 10 blots / 20 min, chamber 4-25 °C / 0-99 % RH, GN2 flow 100 %.
- VIB BECM (Brussels) Leica GP2 SOP, becm.sites.vib.be: GP2 blotting sensor designed for ~4 µL sample; 3 µL works reliably; Whatman 1 paper.
- STAR Protocols 1, 100150 (2020), human 26S proteasome: easiGlow 20 mA 30 s per side; Quantifoil R1.2/1.3 200-mesh Cu.
- Kampjut, Steiner & Sazanov, iScience 24:102139 (2021): Quantifoil carbon 0.6/1 or 1.2/1.3 grids (or UltrAuFoil gold 0.6/1), glow discharge in air 2 min @ 7×10⁻¹ mbar, ~25 mA; Vitrobot blot force 25, blot 4-10 s.
- Wang & Zimanyi, Acta Cryst F 80:74-80 (2024): easiGlow 20-30 mA 20 s (carbon), 20-30 mA 120 s (gold), 10 mA 5 s (ultrathin carbon); use grids within 30 min of glow discharge.
- Nat Commun (2025), Chromera velia PSI structure (10.1038/s41467-025-67637-0): GloQube Plus 45 s @ 35 mA, Quantifoil R1.2/1.3 Cu 300, 3 µL sample, 30 s incubation, 4 °C / 100 % RH.
- ANTcryo support FAQ (nanodim-world.com/support, “Sample Preparation & Handling”); ANTcryo Product Data.
Grid Preparation Protocol: Thermo Fisher Vitrobot Mark IV
Instrument: Thermo Fisher Vitrobot Mark IV plunge freezer
Download PDFGrid Preparation Protocol: Thermo Fisher Vitrobot Mark IV
| Field | Value |
|---|---|
| Product | ANTcryo amorphous Ni-Ti alloy support films (holey films on standard TEM grids) |
| Instrument | Thermo Fisher Vitrobot Mark IV plunge freezer |
| Version | 1.1 |
| Date | 2026-01-01 |
| Status | Released |
This document is part of the ANTcryo technical documentation series. It combines standard cryo-EM grid preparation practice (as documented for Quantifoil holey carbon/graphene oxide grids and the Vitrobot Mark IV) with ANTcryo-specific recommendations. Sources are cited in brackets; ANTcryo-specific notes are marked [ANTcryo]. Parameters marked "starting point" should be optimised for the individual sample.
Revision History
| Version | Date | Changes |
|---|---|---|
| 1.0 | 2025-01-01 | Initial release: Vitrobot Mark IV protocol with ANTcryo blot parameters and after-blotting observations |
| 1.1 | 2026-01-01 | §4.3 parameter table streamlined to the ANTcryo standard only (Quantifoil comparison column removed); §8.1 Figure 1 re-laid out as text and image side by side |
1. Materials
- ANTcryo grids (film side is the dull, non-reflective side) [ANTcryo]
- Glow discharge / plasma cleaner (e.g. Gatan Solarus, PELCO easiGlow, Quorum GloQube Plus, Harrick Plasma)
- Thermo Fisher Vitrobot Mark IV plunge freezer
- Liquid nitrogen (LN2); ethane, or a 63/37 ethane/propane mixture
- Vitrobot pre-punched blotting paper (Whatman No. 1 or equivalent)
- Vitrobot tweezers and forceps clamp
- Grid storage boxes; cryo gloves and face shield
2. Grid Storage and Handling
- Store grids in the original grid box, dark, cool, low humidity; use within 2 years of production to guarantee surface quality. [ANTcryo]
- In humid conditions, keep grids sealed in a dry container and take them out ~30 min before use to equilibrate to room temperature. [ANTcryo]
- Inspect grids under a light microscope before use: grids are usable as long as the film is not visibly torn and the hole pattern is intact, even if the grid was briefly blown off by a gas flow. [ANTcryo]
- Special note: ANTcryo For Cell grids (MS01/MS03) are shipped pre-hydrophilised and can be used directly; after long storage, give them a short plasma treatment first. [ANTcryo]
3. Glow Discharge (Plasma Cleaning, Hydrophilisation)
Glow discharge renders the film surface hydrophilic, which is required for even ice formation and for the sample to stay in the holes. Freshly glow-discharged grids should be used within 30 minutes (hydrophilicity decays with time); some protocols recommend within 15 min. [Wang & Zimanyi 2024; Quantifoil HexAuFoil official]
3.1 Recommended settings
Place grids film side up on a glass slide (or grid holder) in the glow discharge chamber.
| Instrument | Settings (industry standard) | ANTcryo recommendation [ANTcryo] |
|---|---|---|
| Gatan Solarus | H2/O2 mix, ~5-10 W (typical) | H2/O2, 5 W, 30 s (start) |
| PELCO easiGlow | 20 mA, 30 s per side [STAR Protoc 2020] | 15 mA, 30-60 s (start at 30 s) |
| Quorum GloQube Plus | 45 s @ 35 mA [Nat Commun 2025] | 30-60 s @ 25 mA (start) |
| Fischione 1070 | 40 W, 120-180 s, 9:1 Ar:O2, 21 mTorr [Quantifoil HexAuFoil official] | 30-60 s @ 25 mA (start) |
3.2 ANTcryo-specific notes
- The amorphous Ni-Ti alloy withstands glow discharge well; time and intensity can be increased if needed. As a reference, gold-film grids are commonly treated for ~120 s [Wang & Zimanyi 2024]. [ANTcryo]
- For a new batch, first run 2-3 grids to probe the best settings before committing the sample. [ANTcryo]
- Common practice for SPA (PELCO easiGlow): air glow discharge at 20-30 mA for 20 s on carbon grids, 120 s on gold grids, and 5 s on ultrathin carbon-coated grids. [Wang & Zimanyi 2024]
4. Vitrobot Mark IV Setup
Instrument SOP follows the published Vitrobot operating procedure. [Vitrobot Mark IV User Guide; NIH Methods Mol Biol 2024; STAR Protocols 2022]
4.1 Environmental chamber
| Parameter | Typical SPA setting | Notes |
|---|---|---|
| Chamber temperature | 4 °C (SPA typical; up to 25 °C reported) | 4 °C for very sensitive samples [Quantifoil HexAuFoil official; NIH Methods Mol Biol 2024] |
| Relative humidity | 100 % | 90-100 %; keep chamber ports closed when not pipetting |
4.2 Before first use of the day
- Mount fresh blotting paper on the blotting pads; let it equilibrate inside the chamber for at least 5-10 min before blotting. Replace blot paper after every 8-10 blots or when it becomes visibly damp/contaminated. [STAR Protocols 2022; NIH Methods Mol Biol 2024]
- Fill the humidifier with distilled water (~60 ml); fill LN2 into the freezing chamber; condense ethane into the cryogen cup once the chamber is cold.
- Lift the tweezers/ethane pot assembly into position and check that the blotting pads align evenly with a blank grid loaded in the tweezers. Run one test blotting cycle without sample.
4.3 Blotting parameters on the Vitrobot Mark IV (difference vs Leica GP2)
The Vitrobot has a "blot force" dial (arbitrary units, 0-30) in addition to blot time and number of blots. The two blotting pads contact the grid from both sides during the blot step.
| Parameter | ANTcryo standard [ANTcryo] |
|---|---|
| Blot time | 3 s |
| Blot force | 2 |
| Blot total | 1 |
| Wait time | 0 s |
| Drain time | 0 s |
- Start with the ANTcryo standard: blot time 3 s, blot force 2, one blot. This has been verified in multiple experiments and gives a controlled breakage rate while producing thin, even ice. [ANTcryo]
- If ice is too thick, increase blot time in 0.5 s steps or increase blot force slightly (to 3-4). If ice is too thin / holes are dry, decrease blot time or reduce force. [NIH Methods Mol Biol 2024]
- Because the Vitrobot blots from both sides, the mechanical load on the support film is higher than on the Leica GP2. Keep the blot force low (2-3) as the first optimisation axis rather than jumping to force 10. [ANTcryo]
5. Sample Application
- Use 3-4 µL of sample per grid (typical). The Vitrobot blot pads are designed for this volume range. [STAR Protocols 2022; NIH Methods Mol Biol 2024]
- Apply the drop onto the film side; do not touch the film with the pipette tip.
- Concentration starting points [ANTcryo]:
- Apoferritin: 1-1.5 mg/ml as a standard reference (screen 2-3 concentrations if needed)
- For scarce/challenging samples (e.g. membrane proteins): the low-adsorption Ni-Ti surface keeps more of the precious sample in the holes; test a small grid set before scaling up. [ANTcryo]
- Optional: incubate the drop on the grid for 20-30 s in the humidified chamber before blotting (adsorption/incubation improves particle density for some samples). [Nat Commun 2025; NIH Methods Mol Biol 2024]
6. Expected Ice Behaviour (ANTcryo)
- The smooth, uniformly hydrophilic Ni-Ti film favours even ice of 20-80 nm, reducing thick/thin ice gradients. [ANTcryo]
- Under our standard Vitrobot settings (blot 3 s / force 2 / 1 blot), the success rate for ~20 nm ice is notably higher than on conventional carbon films. [ANTcryo]
7. Plunge Freezing and Transfer
- Load the glow-discharged grid on the Vitrobot tweezers (film side facing the side you will pipette onto), clamp the tweezers, and mount the assembly on the plunge rod.
- Raise the tweezers/ethane pot into the humidity chamber and wait for temperature/humidity to stabilise.
- Apply 3-4 µL of sample through the side port onto the film side.
- Start the automated blot-and-plunge sequence. The grid blots, then plunges into liquid ethane.
- After plunging, immediately transfer the grid, while submerged in LN2, from the ethane cup into an open slot of the grid box in the transfer container.
- Store grid boxes in LN2 until screening/data collection.
8. ANTcryo-Specific Observations After Blotting
8.1 Grey/black patches on the blot paper
| After blotting an ANTcryo grid in the Vitrobot, the blot paper may show grey or black patches (Figure 1). This is a normal observation. The support film is held on the metal grid by van der Waals adhesion. **Occasional minor membrane detachment on individual grids is normal** and does not indicate a defective batch. **[ANTcryo]** |
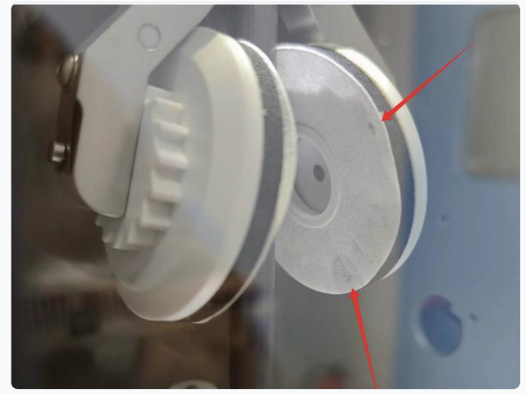 Figure 1. Grey/black patches on the blot paper after blotting an ANTcryo grid in the Vitrobot.
|
[ANTcryo] Quality threshold: If more than ~10 % of the grids in one box show obvious membrane detachment (capture a photo of the blot paper for reference), keep the affected grids and photos and contact service@nanodim-world.com for a one-to-one replacement.
8.2 Membrane damage visible by electron microscopy
Because the Vitrobot blots the grid from both sides simultaneously, the blotting pads exert a relatively strong mechanical force on the support film. The standard ANTcryo support film thickness is 22±3 nm. Consequently, some torn or damaged membrane areas are normal after Vitrobot blotting and do not by themselves justify a product complaint. [ANTcryo]
[ANTcryo] Quality threshold: If 50 % or more of the membrane area on a grid is severely damaged under the microscope, save the EM images and contact service@nanodim-world.com for a one-to-one replacement.
9. Troubleshooting
| Symptom | Likely cause | Remedy |
|---|---|---|
| Wavy/corrugated square edges | Uneven glow discharge; excessive blot force or blot time | Retune glow discharge; reduce blot force to 2 or below / reduce blot time [ANTcryo] |
| Droplets / thick ice | Humidity too low, or blotting too weak | Check chamber humidity (100 %); increase blot time in 0.5 s steps [ANTcryo] |
| Particles stuck to film, few in holes | Film surface not hydrophilic enough | Re-glow discharge (longer time); check the 30-min window [ANTcryo] |
| Grid damage after blotting | Blot force too high; bent grids | Reduce blot force to 2; some edge damage is normal and does not affect data (1-2 central squares suffice); discard bent grids [ANTcryo] |
| Large membrane areas torn or missing | Normal for Vitrobot double-sided blotting; see Section 8.2 | If ≥50 % of membrane is severely damaged, save EM images and contact support [ANTcryo] |
| Poor ice reproducibility between sessions | Humidity/water contamination | Replace blot paper; check humidifier fill; keep ports closed |
10. Sources
- Quantifoil Micro Tools GmbH (SPT Labtech), "Preparing HexAuFoil grids for use": handling, glow-discharge and chamber-condition guidance for holey support films. [Quantifoil official]
- Thermo Fisher Scientific, Vitrobot Mark IV User Guide: chamber operation, blot-pad replacement, and plunge-freezing workflow.
- NIH Methods in Molecular Biology (2024), RNA polymerase complexes by single-particle cryo-EM: Vitrobot Mark IV 4 °C, 100 % RH, wait 0 s, blot 5 s, drain 0 s, blot force 12; 60 mL water in humidifier; 2 × 100 s glow discharge at 15 mA for holey carbon grids.
- STAR Protocols (2022), ligand-gated ion channels: Vitrobot equilibration ~30 min; blot force 2, blot time 3.5 s, 3 µL sample; replace blot paper every ~8 blots; PELCO easiGlow 30 s @ 30 mA.
- STAR Protocols (2020), human 26S proteasome: easiGlow 20 mA 30 s per side; Quantifoil R1.2/1.3 200-mesh Cu; blot force 0, blot time 1.0 s, 2 µL sample per side.
- Kampjut, Steiner & Sazanov, iScience 24:102139 (2021): Quantifoil carbon 0.6/1 or 1.2/1.3 grids (or UltrAuFoil gold 0.6/1), glow discharge in air 2 min @ 7×10^-1 mbar, ~25 mA; Vitrobot blot force 25, blot 4-10 s.
- Wang & Zimanyi, Acta Cryst F 80:74-80 (2024): easiGlow 20-30 mA 20 s (carbon), 20-30 mA 120 s (gold), 10 mA 5 s (ultrathin carbon); use grids within 30 min of glow discharge.
- Nat Commun (2025), Chromera velia PSI structure (10.1038/s41467-025-67637-0): GloQube Plus 45 s @ 35 mA, Quantifoil R1.2/1.3 Cu 300, 3 µL sample, 30 s incubation, 4 °C / 100 % RH.
- ANTcryo support FAQ (nanodim-world.com/support, "Sample Preparation & Handling"); ANTcryo Product Data.
This technical note is provided as technical support. Parameters are starting points; final settings depend on the individual sample and instrument. For batch-specific questions, contact service@nanodim-world.com. © 2026 Nanodim World. ANTcryo Technical Note TN-002, Rev. 1.1.
Grid not behaving as expected?
These are starting points, not fixed settings. Send us your sample type, instrument and a micrograph and we will help you tune the parameters.
Contact technical support →